To start programming with HTML, let’s dive straight away into its fundamental structure. Please copy and paste the below code into a text editor (notepad on Windows, text edit on Mac) and save it as HTML document called ‘index.html’:
<!DOCTYPE html>
<html>
<head>
<title>Your Page Title</title>
<style>
.theDiv {
border: 5px outset purple;
background-color: lightyellow;
text-align: center;
}
ul {
list-style-type: none;
margin: 0;
padding: 0;
overflow: hidden;
background-color: #333;
}
li {
float: left;
}
li a {
display: block;
color: white;
text-align: center;
padding: 10px 14px;
text-decoration: none;
}
li a:hover {
background-color: #111;
}
</style>
</head>
<header>
<nav>
<ul>
<li><a href="index.html">Home</a></li>
<li><a href="news.html">News</a></li>
<li><a href="contact.html">Contact</a></li>
<li><a href="about.html">About</a></li>
</ul>
</nav>
</header>
<body>
<h1>Heading 1</h1>
<h2>Heading 2</h2>
<h3>Heading 3</h3>
<h4>Heading 4</h4>
<h5>Heading 5</h5>
<h6>Heading 6</h6>
<p>Paragraph</p>
<div class="theDiv">
<h2>This is a heading in a div element</h2>
<p>This is how text looks in a div element.</p>
</div>
<p>This is how text looks outside the div element.</p>
<h1>This is a JavaScript:</h1>
<button
type="button"
onclick="document.getElementById('demoDate').innerHTML = Date()"
>
Click here to display Date and Time.
</button>
<p id="demoDate"></p>
</body>
<!-- footer -->
<footer class="site-footer">
<div class="theDiv">
<p>© 2021 Your Page Name. All rights reserved.</p>
<p>
<a href="privacy.html">Privacy Policy</a> and you can put optional text
here.
</p>
</div>
</footer>
</html>
The file name should look like this:
index.html
Please take note that this code is just for your basic understanding of HTML only. If you want to create a complete website, please dive deeper into the programming of HTML sites.
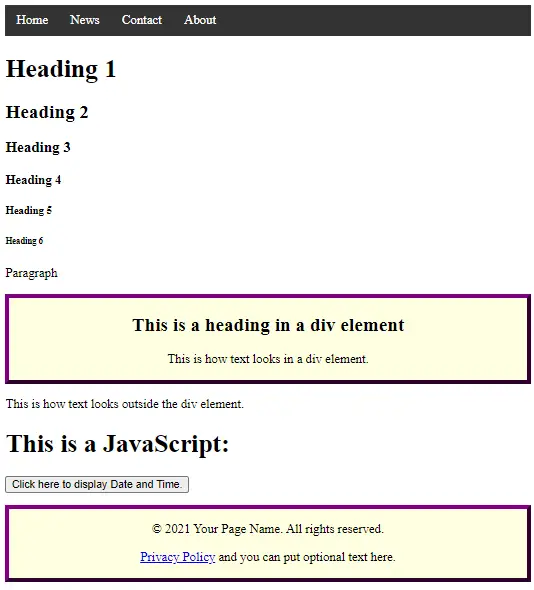
Once you have saved it as HTML format, its icon should be the same as your default browser icon. And when you open it, the page that appears will look like so:
Let’s make a thorough inspection of the coding that is involved.
HTML Document
All HTML documents must start with
<!DOCTYPE html>
Its root is tagged with the < html > tag and ends with the < /html > tag; which can be seen at the end of the text:
<html>
  . .
</html>
Generally </> is an end tag used to close the HTML container. Metadata or data about the page’s HTML data is contained in the < head > tag and is situated before the < body > tag:
Head Section
<head>
  <title>Your Page Title</title>
  <style>
    .theDiv {
      border: 5px outset purple;
      background-color: lightyellow;
      text-align: center;
    }
    ul {
      list-style-type: none;
      margin: 0;
      padding: 0;
      overflow: hidden;
      background-color: #333;
    }
    li {
      float: left;
    }
    li a {
      display: block;
      color: white;
      text-align: center;
      padding: 10px 14px;
      text-decoration: none;
    }
    li a:hover {
      background-color: #111;
    }
  </style>
</head>
There are many elements that can go inside the head tag, but currently, we will only take a look at two; the < title > tag and the < style > tag. Notice where their end tag and elements that they contain.
Title Tag

<title>Your Page Title</title>
Try changing ‘Your Page Title’ to anything else, save the HTML document and refresh the page. You should see the name in the Browser tab changes as well.
CSS Tag
The < style > tag holds the CSS (Cascading Style Sheets) or how your website will look graphically. CSS is what you should change if you’re into creatively designing the display of your website. This method of declaring CSS (the code in the < head > tag) is called internal CSS. There is also the inline CSS (by having it at each HTML element) and external CSS (by having a separate .CSS file).
Header Section
<header>
  <nav>
    <ul>
      <li><a href="index.html">Home</a></li>
      <li><a href="news.html">News</a></li>
      <li><a href="contact.html">Contact</a></li>
      <li><a href="about.html">About</a></li>
    </ul>
  </nav>
</header>
The < header > element represents a container for introductory content or a set of navigational links.
Navigation Tag

Here we have the navigation menu, where each component is a list tag < li > in an unordered list < ul >. The ordered list < ol >, on the other hand, means that you have a numbering system, like so:
- Home
- News
- Contact
- About
Hyperlink Tag
The < a > tag stands for a hyperlink; the link address is the value that “href” attributes. The example above shows index.html and other pages are labelled accordingly. Therefore, the other pages can be designed and located in the same folder, so when visitors click on it, the intended page will appear. The String value or the actual word displayed of the link is between the opening < a > tag and closing < /a > tag.
Body Section
Let’s continue into the < body > tag or the main content of your page.
<body>
  <h1>Heading 1</h1>
  <h2>Heading 2</h2>
  <h3>Heading 3</h3>
  <h4>Heading 4</h4>
  <h5>Heading 5</h5>
  <h6>Heading 6</h6>
  <p>Paragraph</p>
</body>
Heading and Paragraph Tag
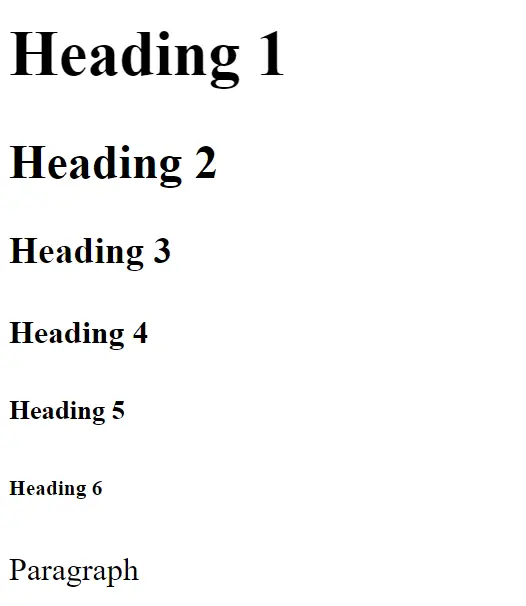
The < h1 > tag to < h6 > tag signify the different sizes of heading and < p > tag is for the paragraph element. You can use these tags imaginatively when designing your blog or articles as you can observe in the result that it produces:

Division Tag
The division tag or < div > determines a section in your HTML file. Each < div > element can be styled differently or having the same style for multiple < div > elements.
<div class="theDiv">
  <h2>This is a heading in a div element</h2>
  <p>This is how text looks in a div element.</p>
</div>

<p>This is how text looks outside the div element.</p>
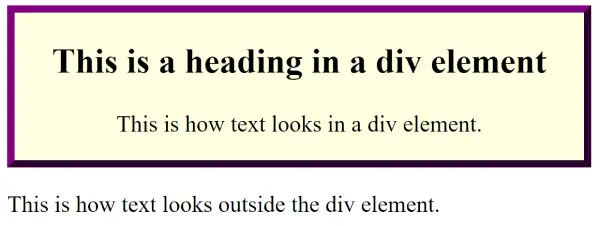
Take note at how the class name “theDiv” coincides with .theDiv in the < style > container or CSS section in the < head > container. This is the result of the above code:
Button Tag
The < button > tag is for user-clicking purposes. In this example, the button’s function is a JavaScript coding that denotes the current date and time.
JavaScript
<h1>This is a JavaScript:</h1>
<button
  type="button"
  onclick="document.getElementById('demoDate').innerHTML = Date()"
>
  Click here to display Date and Time.
</button>
<p id="demoDate"></p>
Similar to the < a > tag, the String value of the button appears in between the opening < button > tag and the closing < /button > tag. Try clicking the button on your live site to see its result! The result is determined by the < p > tag (will appear below the button) with the same id = demoDate.

Comment Tag
<!-- footer -->
The comment tag, or, whatever between < ! - - and - - > will not appear in the front-end of the website; hidden from your visitors. This part is generally used for developers as guidelines to better compartmentalized the website designing experience. You can put comments on any part of a HTML documents.
Footer Section
Lastly, the < footer > section generally provides the legal documents links in the < a > tag. Notice the same theDiv class being used at the division tag too.
<footer class="site-footer">
<div class="theDiv">
<p>© 2021 Your Page Name. All rights reserved.</p>
<p>
<a href="privacy.html">Privacy Policy</a> and you can put optional text
here.
</p>
</div>
</footer>
HTML Entity
From the example, notice the entity & c o p y beside the year 2021. This is the HTML entity of the copyright symbol which appears as © in the live site.
There are various other symbols generated using their very own entity code.
Conclusion
By creating a HTML website, it can offer more flexibility in terms of functions and design. You can get premium functionalities with just a few lines of code. However, there is a steeper learning curve as compared to designing a WordPress site. And, therefore, it can take a longer time if you want to customize your styles quite often. Hope this basic sharing is helpful in your journey to learning more about web design. 😊
What type of website would you like to build? Share it in the comment section here.